I really enjoyed the process of building my CHIP-8 emulator, so after I finished I immediately started looking for another emulator project.
The general consensus on r/emudev and the EmuTalk Forums seemed to point to the 1978 arcade game: Space Invaders. This was perfect for me since it also overlapped my other hobby: arcade machine restoration.
The getting started phase went much quicker than my first emulator since I was able to re-use several components from my CHIP-8's C# codebase: the command line interface program, the SDL GUI program, and the unit test runner. I did take some time to reorganize the project structure.
TL;DR: Skip to the Results section for a video clip and link to the source code.
Intel 8080 CPU
In my CHIP-8 emulator I only had a single project which encompassed the CLI program, GUI, and emulator. This led to tightly coupled modules. While this was fine for a small emulator, I knew this wouldn't work for something larger.
Space Invaders uses an Intel 8080 CPU running at 2 MHz along with some of its own specific hardware. I did all the work on the CPU core in its own module to keep it separate from the rest of the game's hardware. This should allow me to re-use much of my CPU core code for future emulation projects that use the Intel 8080 or it's cousin the Zilog Z80.
An aside: One of my favorite parts of this project was checking out the Intel 8080 Assembly Language Programmers Manual. This manual explains how each opcode works at the byte level and was my main reference. This manual was fascinating because it illustrates how CPUs in this era were simple and understandable. Today's modern CPUs are so complex that even if you write assembly language for them it is not what runs on the bare metal (see: microcode) and they even run entire operating systems in their firmware (the MINIX operating system is embedded in Intel CPUs Management Engine for example ).
One major difference from the CHIP-8 was that CPU speed and the number of cycles executed was important. I needed to count the number of cycles per instruction so that I could throttle the emulation loop to approximately 2 MHz so the game would run at the correct speed.
Additionally, the Intel 8080 CPU has interrupts which can temporarily pause CPU execution in order to temporarily run other opcodes before resuming. Space Invaders fires two different interrupts at 60 Hz; once when the CRT's electron beam is approximately half way down the screen and the other when the beam is at the end (which is also known as VBLANK). We can estimate when these interrupts should occur based on the number of cycles executed.
Audio, video, and shift hardware
Another interesting aspect was seeing how the Space Invaders PCB connected the CPU to other pieces of hardware. The IN and OUT instructions can be used to read and read bits from other "devices". In this case the code "reads" the state of the buttons (pressed or not pressed) and "writes" bits to tell the analog audio hardware when to play sounds.
In this case I didn't attempt to emulate the analog audio hardware, and up until recently even real emulators like MAME didn't either. From what I understand it is computationally expensive to emulate analog hardware, and simply playing back WAV samples when needed is close enough.
Graphics are handled by writing bits into a specific region of memory. In order to place sprites, frequent bit shifting is needed. Unfortunately the 8080 doesn't have opcodes for shifting, so Space Invaders includes a dedicated shift register. This pieces of hardware is accessible via the IN and OUT instructions as well.
Verifying Opcode Behavior
As with the CHIP-8 emulator, building unit tests for each opcode at the same time as implementing the opcode was instrumental for success. It's much easier to test each opcode in isolation than trying to track down bugs when the entire game ROM is loaded and running.
While this saved a ton of time, it didn't catch 100% of the bugs of course. Some of my unit tests made assumptions that weren't correct. Also some of my unit tests were just wrong. I used two additional approaches to verify my opcode behavior and track down bugs: integration testing and adding an interactive debugger.
While unit tests verify the behavior of an individual opcode is correct, bugs can still be possible when you have opcodes that interact. For catching these scenarios I used an integration test by leveraging this CPU diagnostics program for the 8080/8085. By assembling and running this program against my CPU I was able to verify it was mostly correct.
The last few bugs I had to track down weren't caught by either my unit tests or the integration test. There were a couple of crashes that occurred consistently during the game's attract mode when the CPU attempted to access memory locations far outside the game's 8K of addressable memory space. Using my IDEs debugger was helpful in tracking down how the illegal memory access occurred, it was nearly impossible to see which combinations of opcodes and how they interacted that resulted in the wrong memory address being calculated. At this pointed I needed a more specialized debugging tool.
Interactive Debugging
I wrote an interactive debugger that would allow me to debug at a higher level. Instead of stepping over lines of C# code that implemented the 8080 opcodes, I needed to step over individual opcodes and verify register and memory values, just as if I was debugging an 8080 program. So I incorporated the zasm disassmebler and built an interactive debugger.
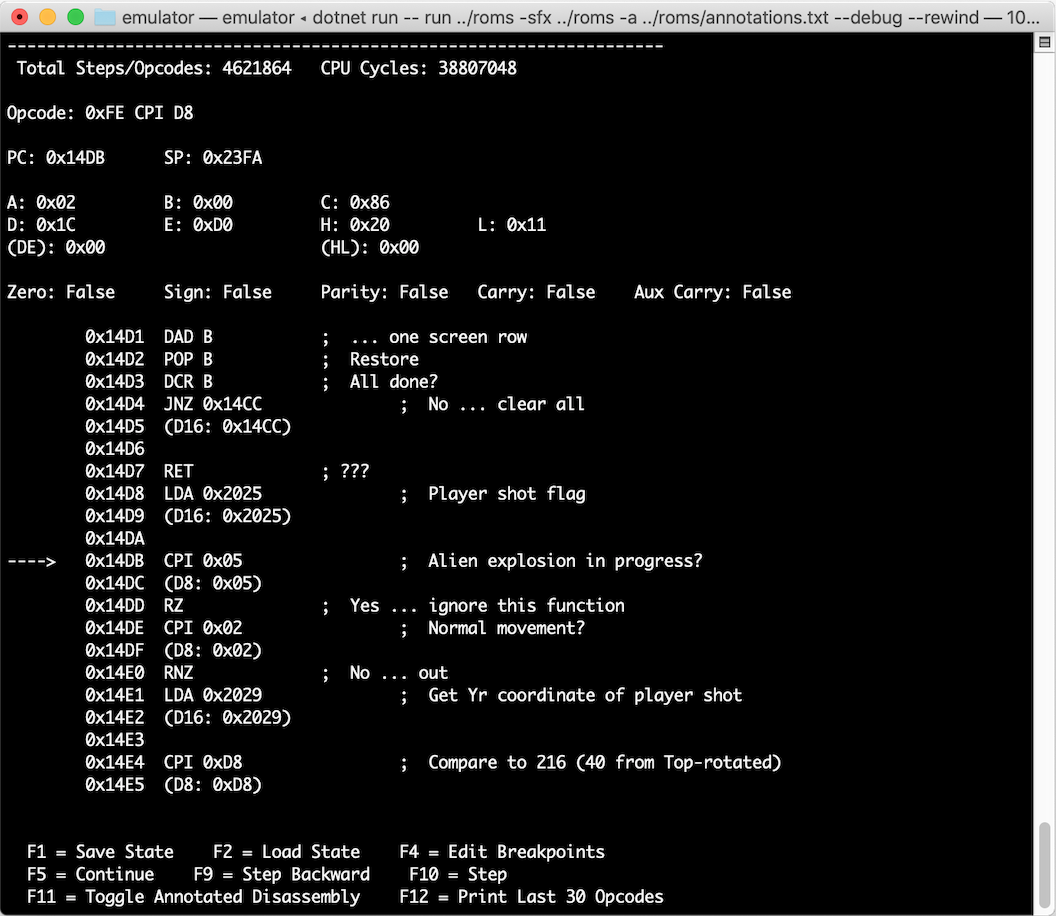
From here I could set breakpoints, inspect register and memory values, single step over opcodes, save and restore CPU state, and view a history of opcode execution. I also implemented a rewind feature so that once I got to the problematic opcode I could them step backwards over opcodes to see how I got there.
This allowed me to track down an issue with the interaction between two opcodes (CALL and RET) which the unit tests and diagnostics program did not catch.
Results
Space Invaders is an excellent second step after finishing a CHIP-8 emulator. It adds a few new concepts (timing, interrupts, external hardware) but nothing too hard. I'm also hoping that I can re-use much of my CPU core for my next project since the Intel 8080 is very close to the Zilog Z80 (perhaps Ms. Pac-Man, Galaga, or even the Gameboy).
You can find more details on GitHub. The readme contains a resources section with some links for recommended reading.

